
LOONatic Mug Rugs

Michele, the Traveling Lunatic, is spending much of her time in Southern California and getting to know the weaving communities there. This blog post and Mug Rug pattern comes from her:
 I am enjoying being part of the Southern California Handweavers Guild. The energy and creativity of the members is amazing, and mentors and eager students abound! Every summer the guild issues a voluntary challenge topic to inspire people to create something with that topic as a muse. It seemed almost meant to be that the creative challenge at the first meeting I went to was “Fowl”. This was the perfect concept for LOONatic Fringe Yarns!
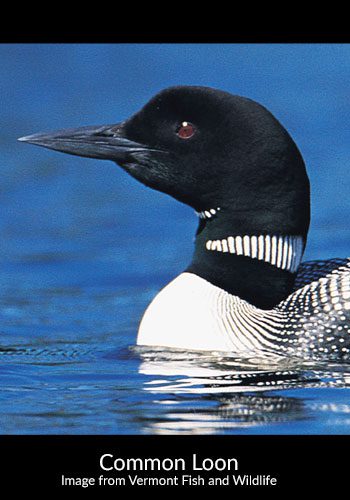
I have been an avid birdwatcher most of my life, and loons have always held a soft spot in my heart. The subtle color palette is soothing, and the stripe pattern on their neck is very appealing in a weaverly sort of way.
Thus, the concept of Loon Mug Rugs was hatched. The mug rugs shown are woven with 3/2 mercerized cotton yarn using the 5-shaft satin pattern. When washed, the fabric has very satisfying ridges. The 4-shaft draft will produce a flat mug rug with equally interesting color stripes with the warp faced and weft faced twills.
It feels like it was a rather Looney summer, so try these quick Mug Rugs to remember the summer that was! Feel free to choose the colors of your choice! We have lots of colors available in 3/2 mercerized cotton. Click here to see the colors.
LOONatic Mug Rugs
Project Description:
- 8 Mug Rugs (approximately 6” x 5.5” (hemmed)).
Photo by Wendy Griffith Total number of mug rugs will depend on how much loom waste you need.
- 2 draft options:
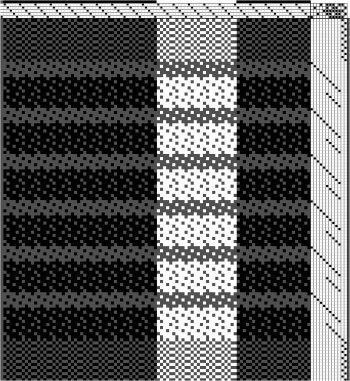
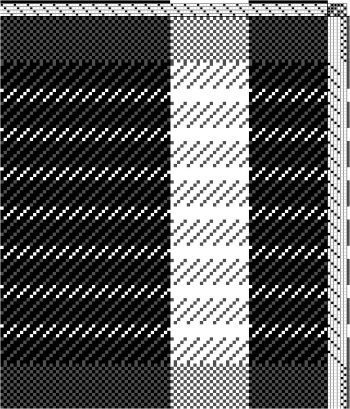
- 4-shaft Twill draft (6 treadles: black and white weft)
- 5-shaft satin weave (12 treadles: all black weft)
- 15 epi
- 4 or 5 harness loom
- Almost 7” wide in reed, 3-yard warp
Equipment needed:
- 4-8 shaft loom with at least 10” weaving width
- 1 shuttle, 2 bobbins
- 10 or 15 dent reed
- Yarn needed: 3/2 Tubular Spectrum™ mercerized cotton.
- 5-shaft Satin: Black 544 yd (8 oz cone); White 100 yd (1.5oz mini cone).
- 4-shaft Twill: Black 485 yd (8 oz cone); White 197 yd (4oz cone).
Instructions:
Wind a 3-yard warp.
For the 5-shaft satin pattern: 25 ends of black, 25 ends of white, 50 ends of black.
For the 4-shaft pattern: 24 ends of Black, 24 ends of white and 48 ends of black.
Thread the loom using a straight draw: Thread 1-5 for 5-shaft pattern, or 1-4 for 4-shaft pattern for the whole warp (see draft). For both the 4-shaft and the 5-shaft patterns, we show two drafts. The “short draft” is intended to show the threading and tieup in a readable form. The long draft shows the entire mug rug so you can see how the colors and the treadling pattern works.
Sett the 3/2 cotton yarn at 15epi. Use either a 10-dent reed sleyed 1,2,1,2… or a 15-dent reed with one end per dent.
Tie-up as directed in the draft of your choice. Choose either the 4-shaft or the 5-shaft draft.
For each mug rug, weave using the same 3/2 black yarn as for the warp. Weave 1- 1/2 “ of plain weave for the hem, then repeat the body treadling sequence in the draft approximately 10 times until the body of the Mug Rug is 6”. Hint: When using the 5-shaft satin, the white warp will show better on the surface of the fabric if there are at least 10 shots using treadles 6-10 (as shown in the draft).
Weave in a contrasting thread between the mug rugs so you know where to zigzag between them when you cut the mug rugs off the loom. Don’t waste warp by putting in more than 1-3 pics to mark between the mug rugs. You will be zigzagging between them to secure the edges.
Cut the completed mug rugs off the loom. Zigzag the ends and in between each mug rug. Wash and then cut apart. Double turn the hems and hem by hand or machine. If you need more information on washing your handwoven fabrics, go to: https://lunaticfringeyarns.com/yarn-care/
Find a cool beverage of your choice and enjoy your new mug rugs.
If you would like a downloadable version of these instructions, we have a free copy available here.