
Fusing Thermoplastic Yarns–by Giovanna Imperia – Blog Post

Giovanna Imperia has been a master of creating interesting fabrics from interesting yarns. We convinced her to talk about a special kind of yarn: Thermoplastics.
by Giovanna Imperia
What are thermoplastic yarns?
While polyester is often classified as a thermoplastic, I tend to separate it from a class of industrial materials where high heat is used to fuse yarns into a solid, stable fabric that retains the original structure (typically woven). In this category, there are a variety of types of thermoplastic yarns — all of which have different properties such as different melting point, different shrinkage due to heat, and different aging stability.
Some of these thermoplastic yarns are made of:
- Vinyl
- Polyethylene (PE)
- Polypropylene (PP)
- Polyvinyl chloride (PVC)
- Polyurethane (TPU)
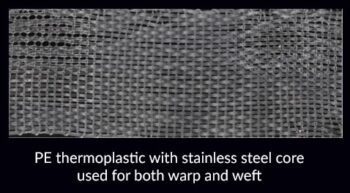
These two examples show the different properties of PE yarn with stainless-steel core and Vinyl yarn. In the first sample, warp and weft is PE yarn with stainless-steel core. This whole piece has been heat treated. The center section is properly fused into a solid woven fabric with no visible damage to the material. The edges show how incremental heat will start melting the thermoplastic making the woven structure unrecognizable and, eventually, exposing the steel core.
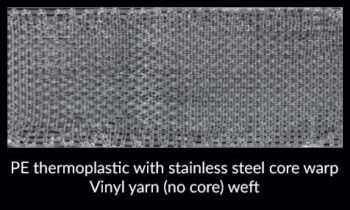
In the second example, the warp is the same (PE yarn with stainless-steel core), but the weft is vinyl (Jelly Yarn) with no core. The woven structure is less readable as the vinyl yarn quickly becomes translucent and starts shrinking as seen on the selvages.
 Many thermoplastic yarns consist of a core covered by one of the thermoplastic materials listed above. Most cores are polyester or stainless-steel. They also come in a range of coatings: transparent, matte, reflective, etc. Both polyester core and stainless-steel core thermoplastic yarns are available from Lunatic Fringe Yarns in their GevolveYarns collection. There is a Thin Thermoplastic yarn with a polyester core that has 200 yards per oz, and a Thick Thermoplastic yarn with a polyester core that has 100 yards per oz. If you want to try a Thermoplastic yarn with Stainless-steel core, they have those yarns as well.
One of the earliest applications for these yarns was the automotive industry. Currently they are extensively used in a number of other industries such as sports shoes, outdoor furniture, wallpaper, carpets.
How to fuse thermoplastic yarns
To fuse thermoplastic yarns, you need a concentrated source of high heat. Good results can be achieved with an iron set on the hottest setting, although this approach may limit you to flat forms.
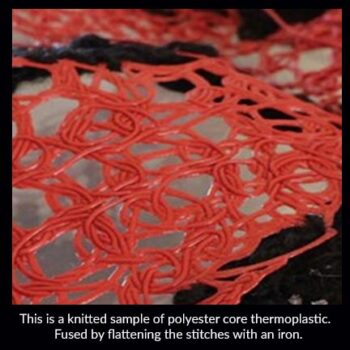
This is a knitted sample of polyester core thermoplastic. Fused by flattening the stitches with an iron. Vinyl yarns can successfully fused in an oven at about 150 degrees. The reason is because the oven can provide diffused heat which will reduce the chance of shrinkage.
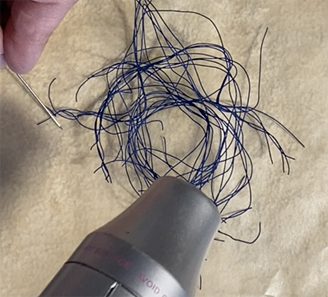
When I want three dimensional shapes in thermoplastic yarns, I find that a heat gun
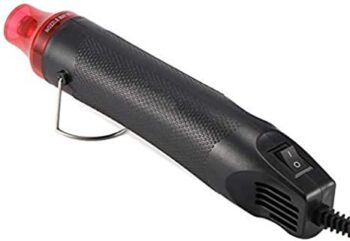
is a great choice for the heat source. My preference is an embossing heat gun rather than the heavy duty one typically used to remove wallpaper. The embossing heat gun is not as hot and has a smaller nozzle. Both features give me more control over the fusing process.
Wax paper is also something else I always have handy when wanting to fuse thermoplastic.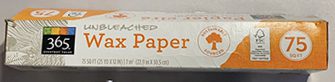
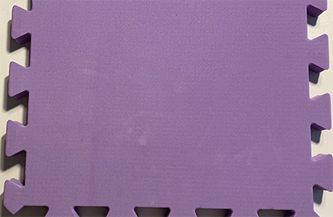
I never place my pieces directly on a table or other flammable surface. I always start with a foam board as a base. I like this type of foam board because I can adjust the size to fit my piece.
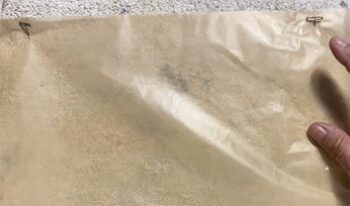
I then cover the foam board with a rag and some wax paper so that my piece will not stick to the rag.
If necessary, you can pin the corners down with T-pins. T-pins can also be used to pin down the piece to be fused to ensure that the right shape is achieved.
 If you have never fused thermoplastic yarns, I suggest you experiment first with a few scraps so that you can get an idea of how the process works, how quickly the yarns will bond to each other, and how quickly the thermoplastic will recede exposing the core material (in this case stainless steel).
Here I am using a T-pin to help me hold down the scraps on the wax paper. You can use long tapestry needles or t-pins to help you manipulate the piece as you are heating it. But be careful. Whatever you use should be made of stainless steel otherwise it will melt. Also, whatever you are using will get hot! Don’t burn your fingers!
Make a Pendant
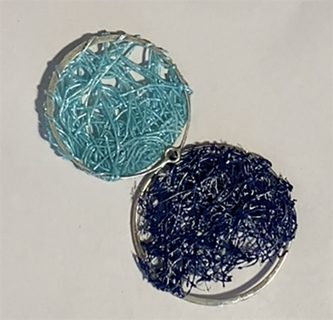
This photo shows a creative way to utilize scraps. I purchased sterling silver pendant frames from Rio Grande an online jewelry supplier.
The turquoise piece is thermoplastic with polyester core. The blue one is thermoplastic with stainless steel core. For the blue one, I decided to apply more heat so that the thermoplastic would recede in places exposing the steel.
Step by Step:
- Step 1. Fuse scraps. I typically do a fairly large piece where I layer scraps of different length. Apply heat to fuse the scraps into one solid fabric piece. Stop whenever you like the look.
- Step 2. Select a section of the fused fabric and cut to fit the frame.
- Step 3. Stitch the chosen section to the frame using the same material.
- Step 4 (optional). Apply heat to fuse the stitches to the frame. Careful. This step must be quick because sterling silver has a low melting point!
Fusing Intensity Matters
When working with thermoplastic yarns, I enjoy experimenting with different fusing intensities. These are two examples of what happens.
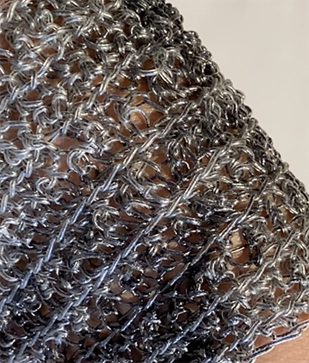 This is a crochet bracelet. The yarn is grayish thermoplastic with a black polyester core. If you look at the photo, you will see that some sections of the bracelet are darker — almost black — than other sections.
The bracelet is fused in its entirety. This means that the individual stitches no longer stretch or move. However, as I apply heat in certain sections, the thermoplastic starts becoming translucent — almost glass like — and the color of the core yarn becomes more visible.
I found this random heat application particularly interesting as it can create points of interest on a larger piece.
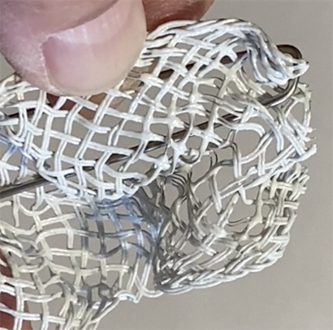
In this example, I used a white thermoplastic with stainless steel core. The brooch was an open braid. Because the structure is very open, it remains very readable even in the areas where I applied more heat. However, where I stopped, you can see that each braided bundle consists of 2 ends. Where I applied more heat, this separation is less clear to the point that the ends have become a single entity. Had I stayed longer in those areas, the thermoplastic would have receded completely leaving only the stainless-steel core visible.
I enjoy using Thermoplastic yarns to create interesting textures and hope this helps you get started with these great yarns.
–Giovanna

Giovanna Imperia is the author of “Kumihimo Wire Jewelry,” and has written many articles on braiding and weaving. Her work has been shown in many juried and invitational national and international exhibits. Selected work has also been reproduced in textile and jewelry books and can be found in private and museum collections.
Giovanna’s work focuses on the exploration of tactile and organic nature of fiber while pushing the boundaries of the expected definition of body adornment and 3D objects. This is accomplished by actively involving the user through the concept of “transformation” – the idea of actively engaging the user with shaping and transforming the art piece.